Farmhouse Kitchen Open Shelf Styling: Arranging Dishes, Wood and Greenery
A repeatable method for open kitchen shelves that look cluttered or bare: clear them, lay a base of white dishes, add wood, glass and greenery, and leave air between groups.
At a glance
- Difficulty
- Easy
- Time
- About 45 to 60 minutes
- Best for
- Open kitchen shelves that look cluttered or bare
- Look
- Calm, collected, warm white and wood
What you need
- Everyday white or cream dishes
- Wooden cutting board
- Wooden bowl
- Two or three plain glass jars
- Stoneware pitcher or other darker piece
- Small trailing plant or faux greenery
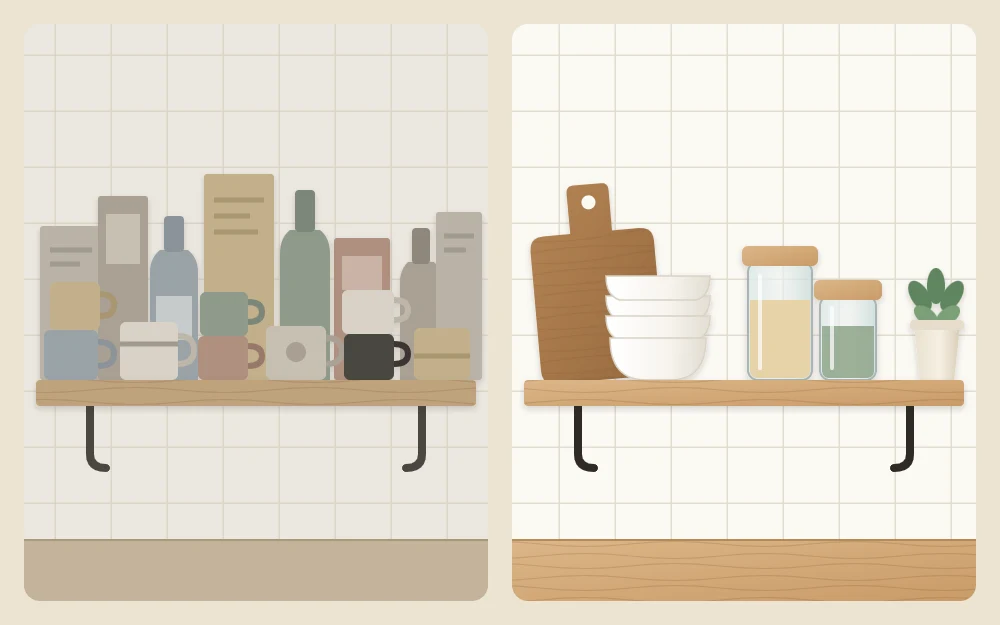
Open shelves show everything, which is both their charm and their problem. Left alone, they drift toward one of two states: packed edge to edge with mugs, boxes and bottles, or nearly empty because nothing seemed good enough to put there.
Kitchen open shelf styling fixes both with the same idea. Your everyday dishes do most of the work, a few pieces of wood, glass and greenery warm them up, and empty space is treated as part of the arrangement. Start by working out which problem you have.
Cluttered or bare? Read your shelves first
Stand across the room and look at the shelves as one picture.
- Too many colors: packaging, printed mugs and mixed plastics compete with each other. The fix is a base of white or cream.
- No gaps: items run in an unbroken line from end to end. The fix is grouping, with air between groups.
- All one height: a flat row of small things. The fix is stacks, leaning pieces and one or two tall shapes.
- Cold and sparse: a few white dishes and nothing else. The fix is wood, texture and something green.
Clear everything and sort it
Take every item down and wipe the shelves. Then sort what you removed into three piles on the counter.
- Everyday dishes: the plates, bowls, glasses and mugs you use most days.
- Good-looking extras: boards, pitchers, jars, a wooden bowl, a small plant.
- Everything else: packaged food, plastic containers, novelty mugs, rarely used gadgets. These go behind a door.
Only the first two piles return to the shelves, and probably not all of them.
Good to know
Shelves carry only what their maker rates them for, and stacks of plates add up quickly. If you are unsure what a shelf can hold, ask the manufacturer or a professional before you load it.
Lay the base: white and cream dishes
Plain white or cream dishes are the backbone of a farmhouse shelf. They do not need to match exactly; mixed whites look collected.
- Stack dinner plates in one pile and smaller plates in another, roughly six to eight high as a starting point.
- Nest bowls in stacks of three to five.
- Line up glasses or mugs in a short double row instead of one long one.
- Give each stack its own spot and leave a hand’s width of empty shelf on at least one side.
Stacks create blocks of calm, which is what a busy shelf lacks most.
Layer in wood, glass and one darker piece
Now bring back the extras, one material at a time.
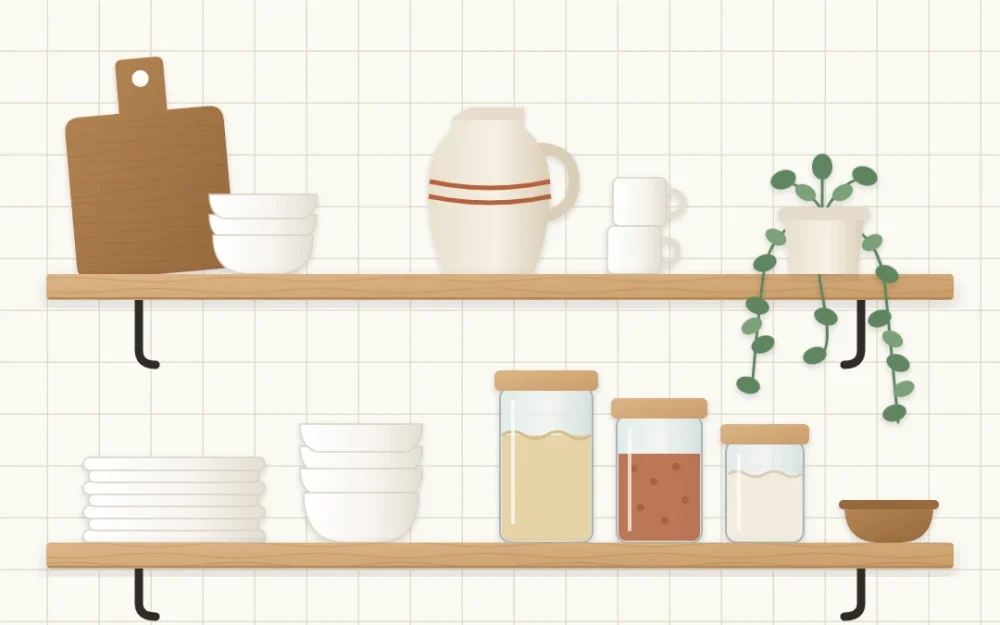
- Wood: lean a cutting board behind a stack, or place a wooden bowl on top of a low pile of plates. Wood breaks up the white and adds warmth.
- Glass: two or three plain glass jars of dry goods such as oats, pasta or beans add shine and a little natural color. Keep labels off or turned back.
- Dark or textured: one or two pieces only, such as a stoneware pitcher, a black metal scoop or a small woven basket. They give the eye somewhere to land.
A slightly worn piece with an older look does this job especially well. There are suggestions for choosing them in the guide to vintage-inspired farmhouse accents.
Arrange heights in a zigzag
With two or more shelves, avoid placing all the tall things at the same end. Put the tallest piece on the left of the top shelf, the tallest on the right of the shelf below, and back to the left on a third. Your eye then travels down the shelves in a zigzag instead of sliding off one side.
Within each shelf:
- Group in odd numbers: a stack, a jar and a small plant read as one group of three.
- Vary heights inside the group: tall, medium, low.
- Leave air between groups, about 3 to 4 in (8 to 10 cm) on an average shelf.
- Pull pieces slightly forward and back so they are not in a ruler-straight line.
The same grouping habits apply to bookcases and living room shelves, and the general guide to farmhouse shelf styling goes through them in more detail.
Add a little greenery
One small plant is enough for a pair of shelves. A trailing plant at the end of the upper shelf softens the hard corner; a pot of herbs or a jar with a few cut stems works on the lower one. Faux greenery is a practical choice where the light is poor.
Keep plants, wood and anything that could scorch well away from the cooktop, and expect shelves near cooking to need wiping more often than the rest.
Keep everyday pieces within reach
A styled shelf that makes cooking harder will not stay styled. Place things by how often you touch them.
- Lowest shelf: daily plates, bowls and glasses, at the front, where you can lift them with one hand.
- Middle: jars of things you cook with each week, and the pitcher you actually pour from.
- Highest shelf: the decorative pieces, such as the leaning board, the plant and the serving bowl that comes out for guests.
Lighter, less-used pieces belong up high for another reason: you will not be reaching overhead for a heavy stack.
Tip
After a week, notice what you moved. Anything you kept shifting out of the way is in the wrong place, however good it looked.
A five-minute reset
Open shelves need a light edit now and then. When they start to look busy again, run through this:
- Remove anything that arrived on its own: mail, packaging, a stray mug.
- Straighten the stacks and return dishes to their spots.
- Check the gaps between groups and reopen any that have closed.
- Swap one thing, such as the stems or the bowl, if you want a change.
If the shelves are right but the rest of the room still feels plain, these farmhouse kitchen decor ideas cover counters, textiles and walls.
Frequently asked questions
Do all the dishes on open shelves need to be white?
No, but a mostly white or cream base makes everything else easier. If your everyday dishes are colored or patterned, treat them as the accent, keep them together in one or two stacks, and choose plainer wood and glass pieces around them so the shelf does not become busy.
How do I deal with dust and grease on open shelves?
Keep the dishes you use and wash every day on the lower shelves, since regular use keeps them clean. Limit purely decorative pieces to a few that are simple to wipe, and plan a quick wipe of the shelves and the less-used items every week or two.
How much empty space should a shelf have?
As a rough guide, aim to see about a quarter to a third of each shelf surface. Clear gaps between groups matter more than the exact amount. If two groups have merged into a continuous row, take one item away and open the space again.